Add a Picture from the Computer
A SharePoint Online tutorial by Peter Kalmström
 Modern
SharePoint pages have two web parts for image addition,
but the classic wiki page gives more options to customize
how the image is displayed. In the demo below Peter Kalmström,
CEO and Systems Designer of kalmstrom.com Business Solutions,
shows how to add a picture from a computer to a wiki page
and how to change the position of the picture. Modern
SharePoint pages have two web parts for image addition,
but the classic wiki page gives more options to customize
how the image is displayed. In the demo below Peter Kalmström,
CEO and Systems Designer of kalmstrom.com Business Solutions,
shows how to add a picture from a computer to a wiki page
and how to change the position of the picture.
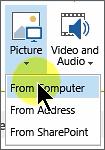
There are three options to add a picture to a SharePoint
wiki page.
- From Computer
- From Address
- From SharePoint
To add a picture from the computer is the easiest way. In
the following demos Peter will explain the other two ways.
These are the steps to add a picture from a computer to
a SharePoint wiki page:
- Click on Edit on the top right of the page. The
page will open in Edit mode.
- Place the mouse cursor where you want to add a picture.

- Open the INSERT tab and expand the Picture? accordion.
- There are three options. Select From Computer.
- Click on the Browse button, select a picture and
click on Open.
- In the Upload Image dialog, select a destination
library where you want to place your picture. The default
choice is Site Assets.
- Click OK, and the picture will be displayed on the
page.
In the demo Peter also shows how to:
- Add a description to your picture.
- Change the existing picture.
- Apply a style to the selected picture.
- Change the position of the picture.
- Add a table to the page and place the picture in
one of the cells.
- Hide table borders.
|