Add Comments and Images to the Recurring Tasks Solution
An Excel tutorial by Peter Kalmström
 In
several earlier demos, Peter Kalmström has showed how to
create an Excel/Power Apps solution for Recurring Tasks
management. Here, Peter shows how to give app users a possibility
to add an image and a comment before they submit the performed
task. In
several earlier demos, Peter Kalmström has showed how to
create an Excel/Power Apps solution for Recurring Tasks
management. Here, Peter shows how to give app users a possibility
to add an image and a comment before they submit the performed
task.
To make this work, Peter inserts two new Text columns in the Tasks table: Comment and Picture. The comments from the app are of course added directly to the Tasks table, but the images are stored in a SharePoint library.
More extensive
changes are made to the TypeScript script in Excel and to
the app i Power Apps. A Power Automate flow uploads the app images to SharePoint and adds their URLs in Exel.
In the
next demo Peter will show how to
make the image URLs clickable in Excel. He will also describe how to add the two new columns to the TasksArchive
table.
Script
In the AddTasks script, the two new columns must be added
to the Template class, to be included when new instances
are created in the Tasks table. The cells should be empty,
as their values will come from the app.
- In the ToNewTaskArray method, copy the Done At row
(or another row with an empty string) and paste it twice
below the Due Date row.
- Change the comment text in the pasted rows to Comment
and Picture.
- Now the modified method will look like this:
public ToNewTaskArray(): Array<string> {
let NewArray: Array<string> = [];
NewArray.push(new Date().getTime().toString());
NewArray.push(this.Title);
NewArray.push(new Date().toISOString().substring(0, 10));
NewArray.push("");
NewArray.push("");
NewArray.push("");
NewArray.push("0");
NewArray.push(this.NexDueDateIso);
NewArray.push("");
NewArray.push("");
return NewArray;
}
- In the AddAsTask method, change the filling range
of the non-formula cells from A-H to A-J:
const NonFormulaCells = WB.getWorksheet("Tasks").getRange("A" + LastRow.getRowIndex() + ":J" + LastRow.getRowIndex());
App
In the Power Apps Studio, Peter creates a new screen and
changes how data is submitted to Excel - and now also to
SharePoint. The bold names will be used in code.
PhotoAndComments Screen
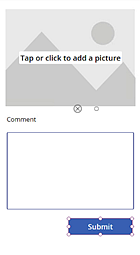
Peter adds a third screen with controls for adding an image,
typing a comment and submitting the data.

- Add ta new blank screen to the app: PhotoAndComment.
- Insert an Add picture control in the new screen.
Rename the button to btnAddImage and the image
container to TaskImage.
- Insert a Text label below the Add Picture control
and change the label text to Comment.
- Insert a Text input control below the label and
rename it to TaskComment.
- Expand the Text input control and change its mode
to Multiline. Remove the Text input text but keep the
double quotes, so that the default is blank.
- Insert a button below the Text input control. Change
its text to Submit.
App OnStart
Peter adds variables that run when the app starts.
- Select the App and its OnStart property.
- Create three variables. THey will be used to reset
the image, to store the file name and to store the selected
minutes worked value:
Set(ImgBlank,true);
Set(TaskFileName,"");
Set(TaskMinutesWorked,0);
- Run the OnStart code.
MinutesWorked Screen
Earlier, the buttons on the MinutesWorked screen submitted
the data and took the user back to the start screen. Now
the PhotoAndComment screen should be displayed instead,
and the minutes worked that the user selected will be saved
in the TaskMinutesWorked variable. The Submit code will
be moved to the PhotoAndComment screen.
- Select the gallery template.
- Change the first argument of the Navigate function
to PhotoAndComment: Navigate(PhotoAndComment);
- Above the Navigation function, set the TaskMinutesWorked
variable to the selected value: Set(TaskMinutesWorked,ThisItem.Minutes);
- In the Patch function, change the Minutes Worked
value to the variable: 'Minutes Worked':TaskMinutesWorked
- Select all code above the variable and cut it.
PhotoAndComments Screen
The Submit button in the PhotoAndComments screen must have
a formula that sends all data to Excel. The image should
also be saved to the SharePoint library.
- Select the Submit button and its OnSelect property.
- Paste the code that was cut from the MinutesWorked
screen over the default false value.
- Refresh the data source, to get the new columns
in the Excel Tasks table to the app.
- Select the Submit button and add the two new columns
to the Patch function:
Comment:TaskComment.Text and Picture:TaskFileName.
- After the Patch function, add a Reset function for
the comment text: Reset(TaskComment);
- To Reset the image container, first set the button's
Reset property to the variable ImgBlank. Then, in the
Submit button code, set the variable first to false,
so that an image can be included, and then to true so
that the container becomes blank again.
- Navigate function to take the user back to the first
screen after submission.: Navigate(OpenRecurringTasks);
Flow
The Add picture control works for uploading images to the
app, but a flow is necessary to upload the image to SharePoint
and add the URL in Excel. Peter uses the encoding method
Base64 to transfer the binary image data into text that
can easily can be embedded in the SharePoint library.
- Click on the Power Automate icon in the Power Apps
Authoring menu and Add and instant flow.
- Click on Create new flow and select a blank flow.
The flow opens in edit mode in Power Automate.
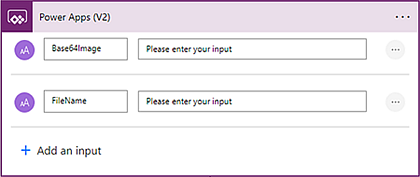
- Enter the Text inputs Base64Image and Filename.

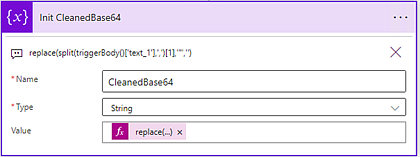
- Initialize a string variable, to clean up the Base64.
Call it CleanedBase64.
- Use the dynamic content for Base64 to build a value
expression that splits it at the comma (Base64 has a
starter part and a body, divided by a comma) and takes
only the body part. Remove the double quotes in the
string by replacing them with nothing in the whole expression:
replace(split(triggerBody()['text_1'],',')[1],'"',‘’)

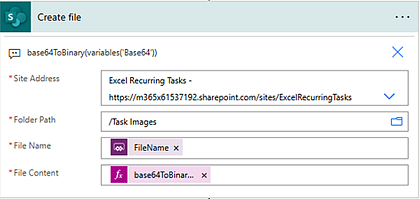
- Add another step: SharePoint, create file.
- Select the Site and the Folder(=the library name).
- Enter the File name as dynamic content.
- Build an expression for the File content. Use the
Base24ToBuinary function and add the dynamic content
for the variable as argument: base64ToBinary(variables('CleanedBase64'))

- Name the flow SaveTaskImage and Save it.
App, PhotoAndComments Screen
When the flow is saved and loaded to the app, the Submit
button code must be modified so that all data and the image
URL is sent to Excel and the images are uploaded to SharePoint.
- Use an If statement with IsBlank to set the file
name to blank if the statement is true, that is, if
there is no image:
If(IsBlank(TaskImage.Image), Set(TaskFileName,"");
- If the statement is false, and there is an image,
it should be named after the ID of the selected task.
Use the Concatenate function to make the multiple strings
in the file name appear continuous, and find the extension
of the uploaded file:
Set(TaskFileName,Concatenate(Gallery1.Selected.ID,".",
Mid(bntAddImage.FileName,Find(".",bntAddImage.FileName)+1)));
- To send the image to SharePoint, call and run the
flow and send in the JSON of the selected image:
SaveTaskImage.Run(TaskFileName,
JSON(TaskImage.Image,JSONFormat.IncludeBinaryData));
- To get the file name to SharePoint, Set the file
name again and hard-code the URL to the SharePoint library:
Set(TaskFileName, Concatenate("[URL]/",TaskFileName));
|
 |
 |
| Software that enhances SharePoint |
 Kanban Task Manager
Visualize and co-operate on projects and tasks in SharePoint
and/or Outlook |
 Pivot Explorer
Visualize and analyze list data in SharePoint |
 Templates Manager
Find, use, manage and distribute Office templates in SharePoint |
 Calendar Browser
Resource booking in SharePoint calendars |
|